

12 Pro Secrets for Your Christmas Village Displays From Flat to Fantasyland
Ah, the Christmas village display. Is there anything more magical? That moment when you dim the overhead lights and your entire miniature town starts to glow… those tiny houses with their warm, inviting windows, the little ice skaters, the town church. It’s pure, condensed holiday magic.
But let’s be real. You’ve been collecting for a few years. You’ve got the houses (God bless Dept. 56 and Lemax), you’ve got the tiny people, and you’ve got… a tangled mess of wires. How do you go from a few houses lined up on a bookshelf to a breathtaking winter wonderland?
I’ve been there. My collection started with a single ceramic church my mom gave me. Now, it’s a full-blown seasonal real-estate venture that takes over my living room. I’ve made all the mistakes—the flat displays, the visible power strips, the “snow” that looks like a lumpy sheet.
So, let’s talk about how to take your Christmas village from “cute” to “absolutely stunning.” I’ve got 12 display ideas and pro-tips that will completely change your village game.
🏔️ The Foundation: It’s All About the Levels!
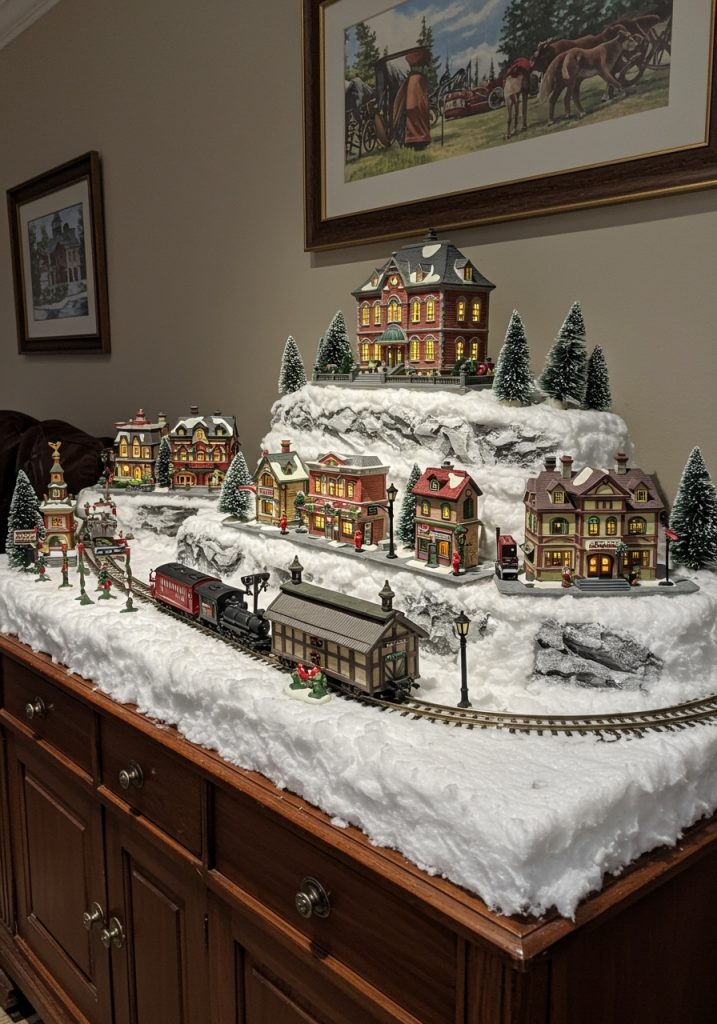
Before we get to themes, let’s cover the single most important rule of village displays: flat is boring. A real town has hills, valleys, and varying heights. Your village needs this, too!
1. The Styrofoam Hillside

This is the number one trick the pros use, and it’s so easy. Get large, flat sheets of white Styrofoam (you can find them at any craft or home improvement store).
Start by laying down your base level. Then, cut and stack smaller pieces, creating staggered hills and platforms. This does two amazing things:
- It creates visual interest and “viewing platforms” for your best houses.
- It creates channels and “tunnels” underneath where you can hide all those ugly wires!
Use a hot knife (in a well-ventilated area, please!) to carve smoother edges or even create paths.
2. The “Upcycled” Box & Book Method
Don’t want to mess with foam? Raid your recycling bin. Use sturdy cardboard boxes, shoe boxes, or even old hardcover books to create different levels under your snow blanket.
I often use a few big, flat-topped plastic storage bins (the ones I store the village in!) as the base for my “mountain” section. It’s free, it’s fast, and it gives you major height.
📍 Location, Location, Location (Where to Build)
Where you place your village sets the entire stage. Think beyond the console table!
3. The Classic Mantel Masterpiece

If your collection is on the smaller side, the fireplace mantel is the perfect spot. It’s a natural focal point of the room. A long, narrow village looks incredibly elegant.
Just be mindful of heat! If you use your fireplace, make sure your pieces are high enough or the mantel is deep enough that nothing will melt. This is one of my all-time favorite winter mantel ideas because it can stay up well into January.
4. The “Vertical Village” (Bookshelf or Hutch)

No floor space? No problem! Go vertical. A tall bookshelf, a glass-front cabinet, or a dining room hutch makes for a stunning, “apartment-style” village.
Each shelf can be a different “neighborhood.” Maybe the bottom is the town square, the middle is the residential district, and the top is the North Pole workshop. This is a brilliant trick for small living room ideas where every square foot counts.
5. The Under-the-Tree Wonderland

This is a dose of pure nostalgia. Building your village around the base of your Christmas tree creates a magical, immersive world. The tree itself becomes the “giant forest” or the “mountain” that looms over the town.
This is the perfect place to add a model train. A train circling the tree and passing through the village? It just doesn’t get more classic than that.
🎨 Let’s Talk Themes: Telling a Story
Your display will have so much more impact if it tells a coherent story. Instead of just “all my houses,” pick a theme and run with it.
6. The “Dickens-Era” Victorian Vibe
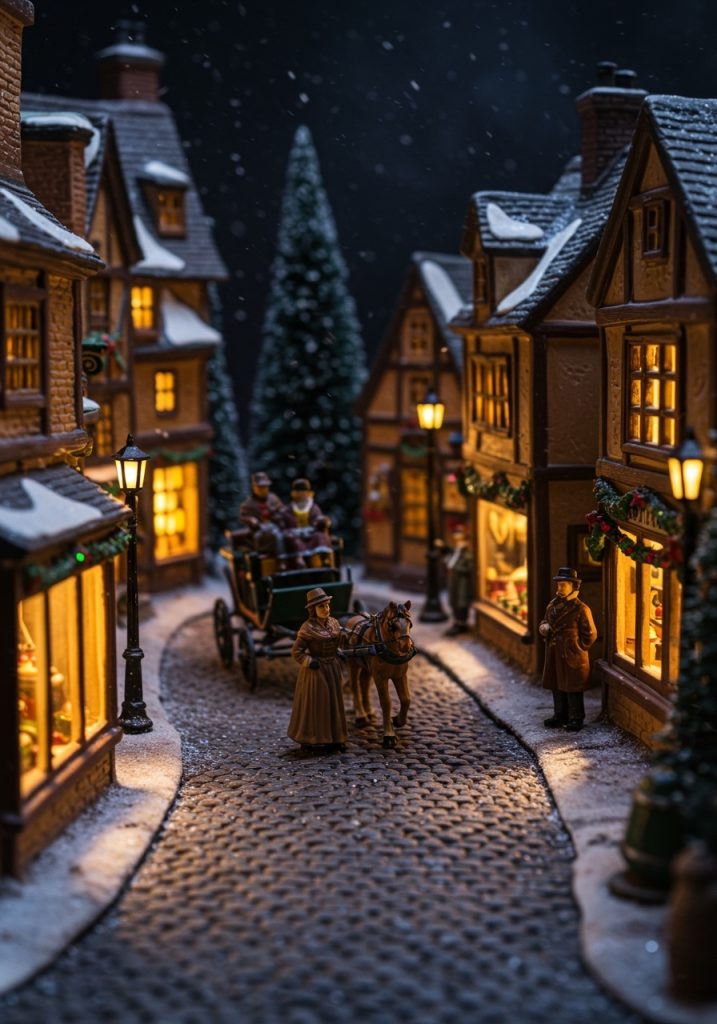
This is my personal favorite. Think cobblestone streets (you can buy mats for this!), gas lamps, carolers in top hats, and horse-drawn carriages.
The color palette is usually more subdued: deep reds, forest greens, and lots of snowy white. This theme is all about nostalgia and old-world charm. It fits perfectly with classic, porcelain-style houses.
7. The North Pole / Santa’s Workshop

Ready for pure, whimsical fun? This theme is all about magic. Go heavy on the “fantasy” pieces:
- Santa’s Workshop
- The Reindeer Barn
- The Elves’ Bunkhouse
- Mrs. Claus’s Bakery
The colors here are bright and joyful—lots of candy-cane reds, bright whites, and shimmering tinsel. Don’t forget to add tons of elf figurines!
8. The “Hometown USA” (Mid-Century Magic)
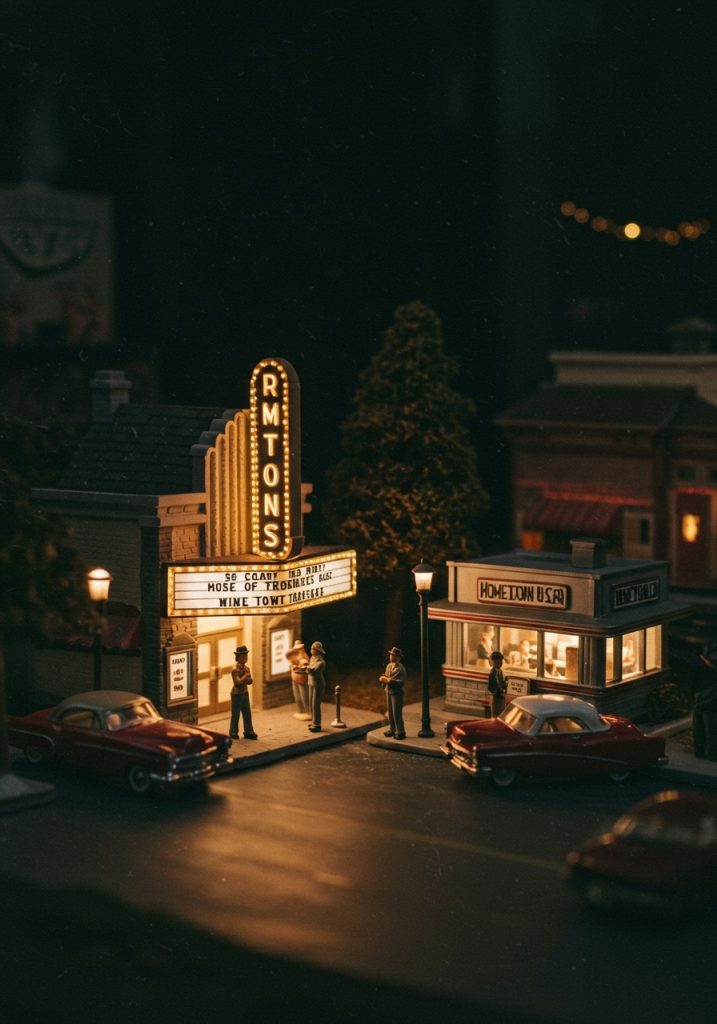
This theme just feels like a warm hug. It’s the 1950s/60s small town you see in all the best Christmas movies.
Think of a classic town square with a gazebo, a vintage movie theater, a cozy diner, and classic cars parked on “Main Street.” This is a key part of many Christmas living room ideas because it’s so relatable and nostalgic.
✨ Pro-Level Details That Make It Sing
You’ve got your levels and your theme. Now for the fun part: the “scatter” and details that bring it all to life.
9. The Mirror Lake or Skating Rink
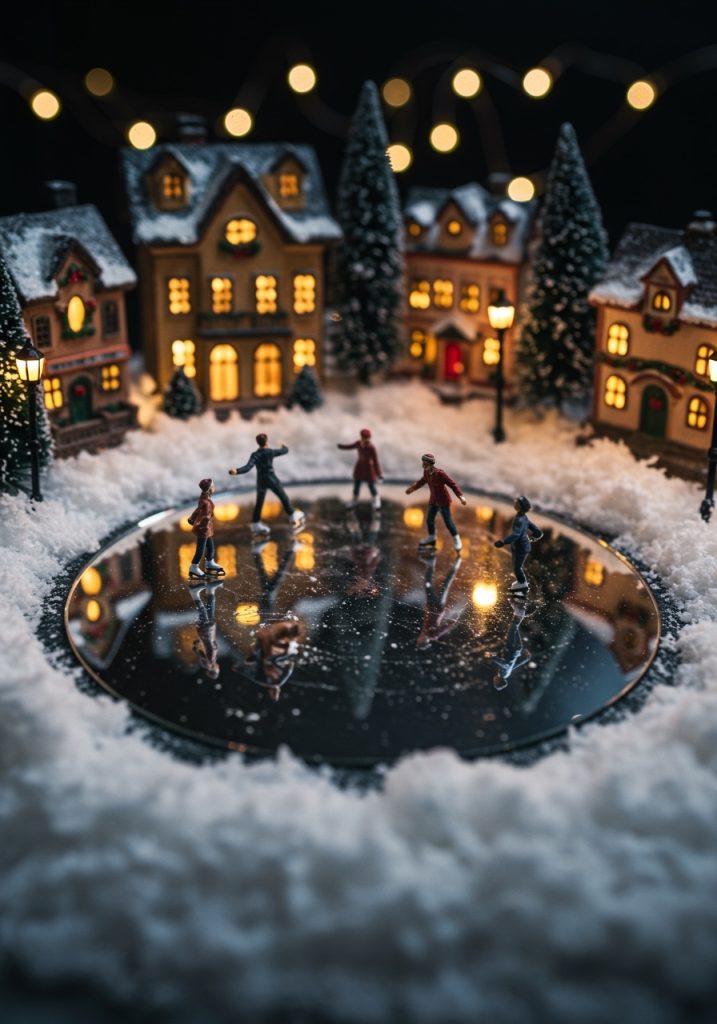
This is my favorite, easiest trick. Go to a craft store and buy a simple, flat craft mirror. It can be round, square, or a wavy custom-cut shape.
Lay it flat on your display base before you put down the snow. Tuck the “snow” (we’ll get to that) right up to the edges. Add a few skater figurines on top, and you have an instant, realistic-looking frozen pond or skating rink. The way it reflects the village lights is just… chef’s kiss.
10. The Magic “Snow” Blanket (Your Best Friend)
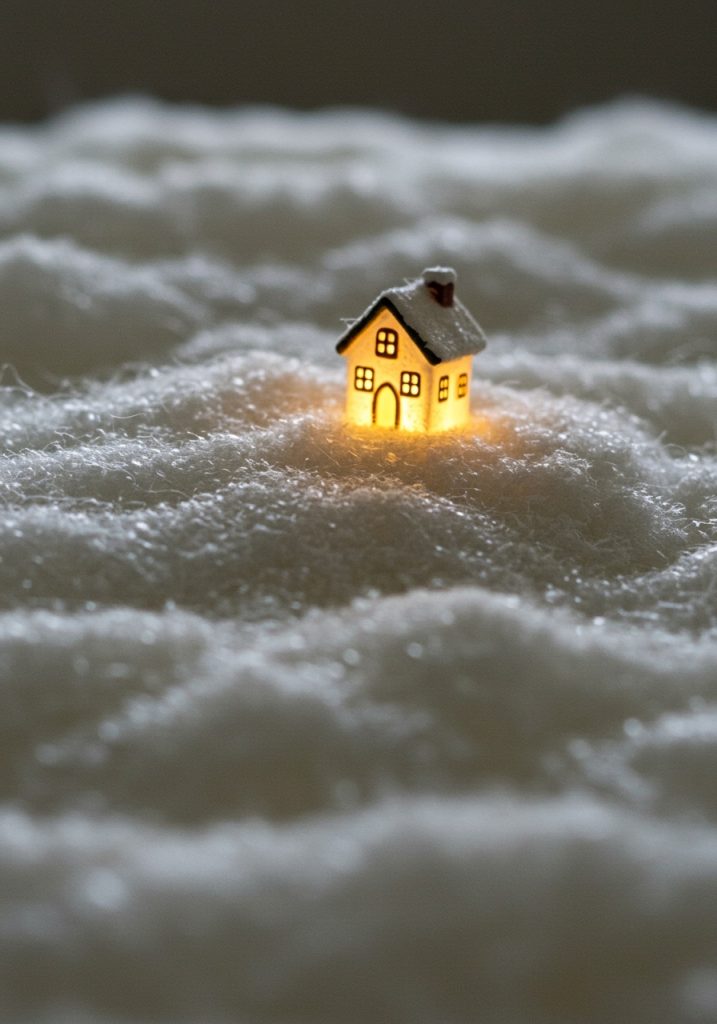
Forget that clumpy, cotton-ball “snow.” Your best friend is the fluffy white snow blanket or “snow batting” that comes in a big roll.
This is what you drape over your entire base (the foam, the boxes, everything). It softens all the hard edges, creates a beautiful, seamless landscape, and, most importantly, hides all your wires! You can cut small slits in it to poke the house lights and cords through, feeding them down into your hidden channels.
11. Create a “Bottle Brush” Forest

A village with no trees just looks… naked. You need a forest!
Stock up on bottle brush trees. Lots of them. In all different sizes. A few large ones can frame a “hero” building like the church, while clusters of tiny ones can create a miniature forest on your hills. Use them to fill in any awkward, empty spaces. IMO, you can never have too many trees.
12. Add a Twinkling Sky (or Background)
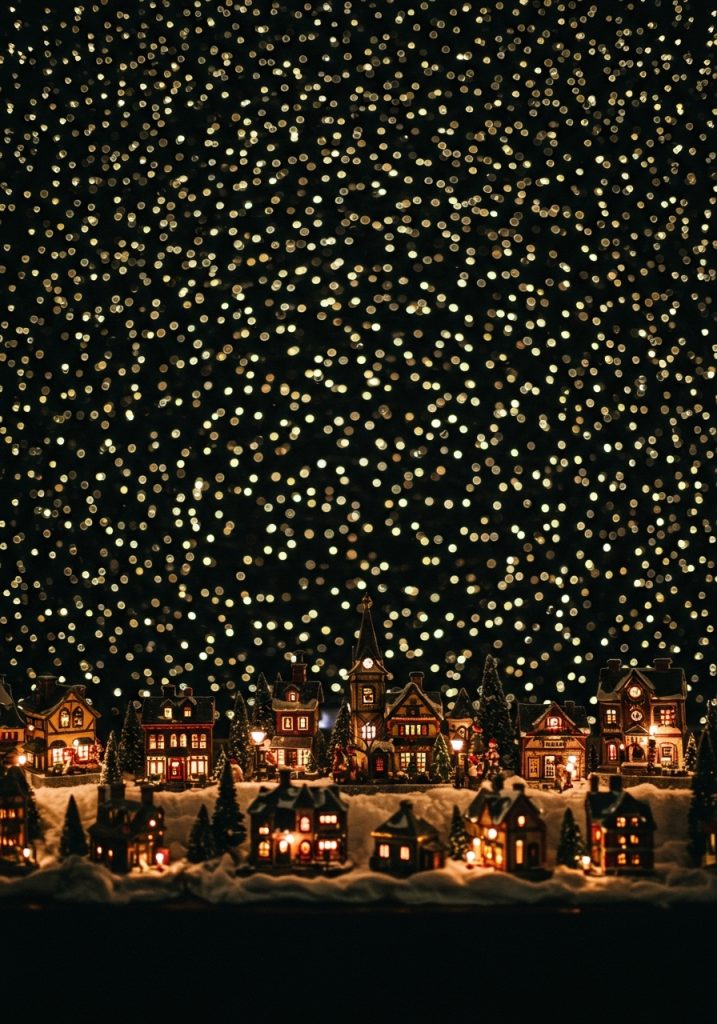
This is a new one I tried last year, and it’s a total game-changer. Your village doesn’t have to just… end at the wall.
Get a string of tiny, battery-operated fairy lights (the ones on thin wire). Tape them to the wall behind your display in a random, starry pattern. When you turn them on, it creates a magical, twinkling night-sky backdrop for your town. This is one of the best 5 string light ideas you can borrow for a village.
🔌 A Quick Chat About Wires (The Village Nightmare)
We have to talk about it. Nothing ruins a magical scene faster than a “spaghetti monster” of black and white cords snaking over your pristine snow.
The Power Strip is Your Secret Weapon
The first thing you should place on your table (before any foam or boxes) is your power strip. Get one with plenty of outlets. Place it in a central, but hidden, location. This is your “power hub,” and all cords will run down to this spot.
Drill, Baby, Drill
If you’re using a dedicated “village board” (like a piece of plywood or a folding table), don’t be afraid to drill holes.
I use a 1-inch drill bit to create holes directly behind where each house will sit. I feed the light cord down through the hole and plug it into the power strip hidden underneath. The result? A perfectly clean, wire-free landscape. It’s a little bit of work, but the payoff is huge.
Embrace Battery-Operated Pieces
So many of the newer accessories—light-up figurines, tiny lamp posts, single trees—now come with battery packs. Use these to your advantage!
These are perfect for the “front” of your display or for little scenes that are far away from your main power hub. They let you add light to remote “hilltops” without running an ugly cord all the way up.
🎁 Wrapping Up Your Winter Wonderland
Phew! That was a lot, but I promise it’s worth it. A great Christmas village display isn’t about how many pieces you have. It’s about the story you tell.
By adding levels, picking a theme, hiding those wires, and layering in details like trees and a “sky,” you create a little world that people can get lost in. It stops being a “collection” and starts being a destination.
My village is never truly “done.” Every year I change something—I add a hill, I start a new “suburb” on the bookshelf. And that’s the joy of it. It’s a living, breathing part of my holiday tradition.
So, what’s your plan? Are you going to finally build that mountain? Or maybe try the mirror-lake trick? I’d love to hear what your favorite, can’t-live-without village piece is!
Happy building!


